Heading
The Heading module inserts a heading into your row that is rendered with a heading tag (H1, H2, etc.) in the HTML output.
Uses of the heading module
While you can create headings right in the text editor, here are some advantages to using a Heading module:
You can more easily move the heading around in the layout by dissociating it from the following text.
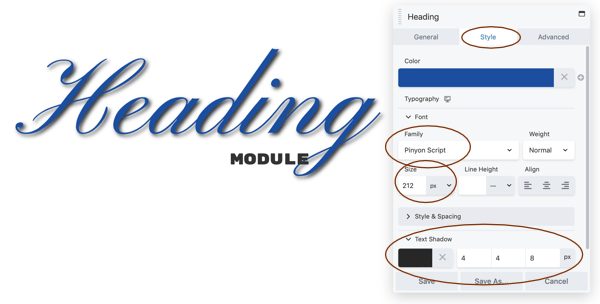
You can easily customize typography, layout, and effects of individual headings (font family, weight, color, size, spacing, horizontal alignment, text shadow, animations, and margins). The screenshot above shows two headings, with the lower superimposed on the upper. The upper heading has a custom color, font family, color, and a text shadow. Spacing is manipulated with margin settings, and the margin setting is responsive so you could control the spacing at different device sizes.
You have more control over the margins of the heading and so can control where the heading appears in relation to the text that follows.
You can use HTML markup (such as the
<br>tag for a line break) or even shortcodes in the Heading field of the Heading module.If you use Beaver Themer, you can also use field connections for several Heading module settings, in both Beaver Builder and Themer layouts. Examples of field connections in the Heading module:
- You could connect the Heading field to the site title that is defined in your WordPress settings ( Settings > General from the WordPress admin panel), so if the name of the site changed, the name would also change anywhere that field connection was used.
- You could add the current year to your heading text as a field connection shortcode, such as keeping the year current in a copyright statement that you insert into a layout.
- You could create a custom field for the color value for headings, then specify the color value for each page or post on the WordPress editing screen, then add a field connection to that custom field from the Color field on the Style tab in each Heading module. To change the color, you only have to change it once in the custom field on each page or post, not individually in each Heading module with a custom color. You can use a WordPress custom field, the Advanced Custom Fields plugin, or the Pods plugin to create custom fields.
Heading module settings
Items with an asterisk (*) have the option of setting a field connection if Beaver Themer is installed.
General tab
The General tab contains the following fields. An asterisk (*) indicates the ability to create a field connection if Beaver Themer is installed.
Heading * Enter text, basic HTML tags (such as a
<br>tag), or a Beaver Builder shortcode.HTML tag Select the heading level (H1, H2, etc.). This automatically inserts the correct heading tags into the rendered page.
Link * Add a URL if you want the heading to contain a live link. Click Select for assistance in creating the URL to another page on your site.
Style tab
The Style tab contains the following settings.
Color * Default heading color is usually specified in the theme, but you can choose a custom color here.
Typography section This is the standard Beaver Builder Typography section, with settings for the font family, weight, size, spacing, and so on.
Tip: While you can choose a custom Google font in each Heading module, be careful about using too many different fonts if you're trying to pare down page load times. You can check load times of your combination of Google fonts at fonts.google.com.
Advanced tab
There are all the usual Advanced tab settings for margins, visibility, animations, and advanced HTML settings.