What can I do with Beaver Builder?
Here's an overview of the Beaver Builder plugin, Beaver Builder Theme, and a little bit about what Beaver Themer adds if you need it. See also the article What can I do with Beaver Themer?
Plugin vs. Theme vs. Beaver Themer
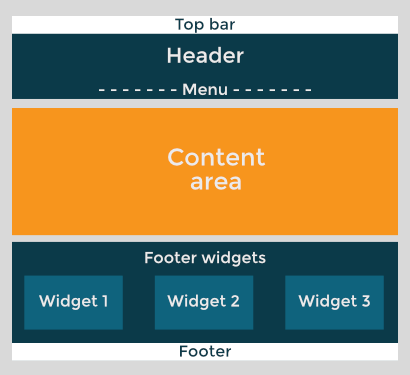
WordPress makes a distinction between the content area of a web page and all the other areas, including header, sidebar, and footer, as shown in this diagram:
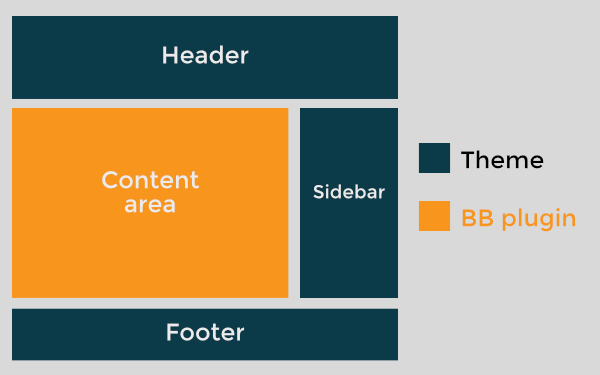
Here's how Beaver Builder fits into that.
The Beaver Builder plugin lets you create intricate layouts in the content area of the page. Out of the box, Beaver Builder is enabled for pages, but there are settings to enable it for the content area of posts and custom posts.
A WordPress theme is a mandatory component of a WordPress site. It controls the header, footer, and sidebar areas of your site. For a single Post, it also controls the display of post information (post title, author, featured images, categories, and so on). Depending on the theme you choose, you may also be able to configure or suppress these areas on individual pages and posts, using WordPress page templates.
The Beaver Themer plugin lets you build layouts in areas outside the content area, which are normally controlled by the theme. You can specify which pages the Themer layouts apply to and which users can see them. Beaver Themer is an add-on that uses the Beaver Builder plugin to build these layouts. See the examples below.
The following sections show you the basic concepts underlying content layouts with the Beaver Builder plugin, the parts of the page controlled by the theme, and how the Beaver Builder Theme integrates with and enhances the plugin.
Beaver Builder Plugin
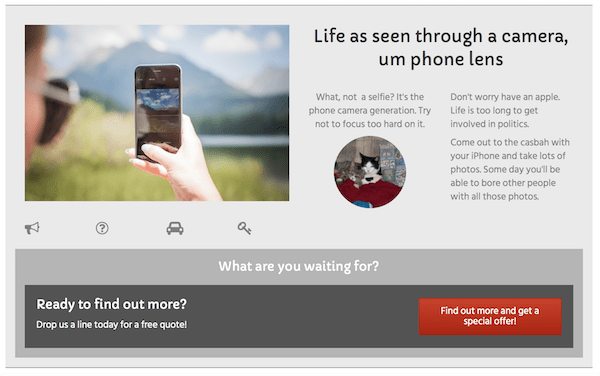
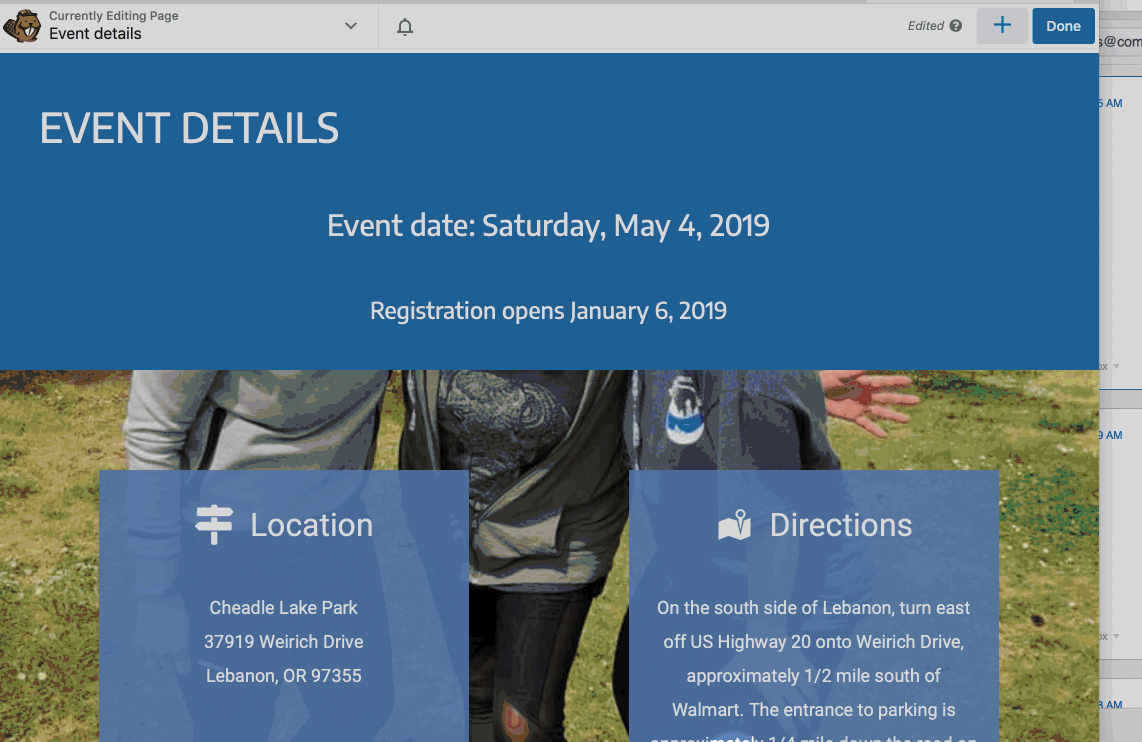
The Beaver Builder plugin is a front-end layout and style designer that gives you a WYSIWYG view of the content area as you develop it. Starting with one of the Beaver Builder layout templates or a blank page, you can easily modify and add content modules in complex arrangements of rows and columns, as shown in this example:
Start with a layout template, prebuilt rows, or a blank page
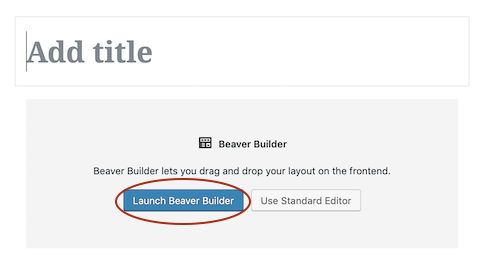
When you create a new WordPress Page, you'll see the Beaver Builder launch button on posts and pages for which the WordPress Standard (block) editor is enabled:
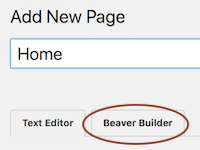
Or you'll see the Beaver Builder tab on posts and pages for which the WordPress Standard editor is disabled:
On the editing page, you'll see the Beaver Builder admin bar at the top of the screen. Click the Plus icon on the upper right side, and do any of the following to get started.
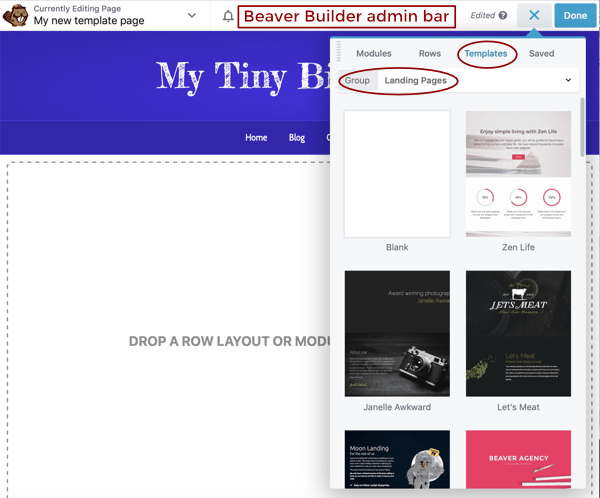
- Start with a content layout for the page and modify it. Click the Templates tab and click any template to insert it. Choose a different template type in the Group field for more choices. See this article on layout templates for more information.
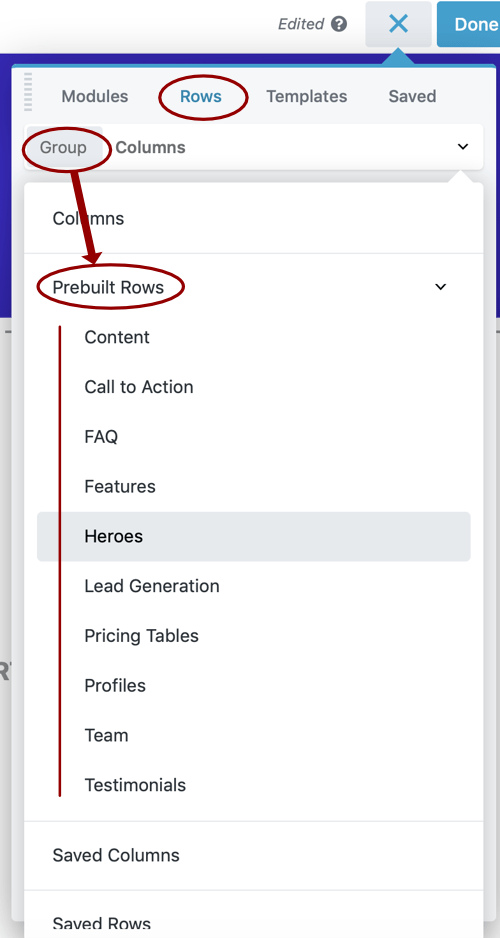
- Add one or more prebuilt row layouts and modify them. Click the Rows tab, in the Group field select Prebuilt rows, then choose a category and drag your selection into the layout. See this article on prebuilt rows.
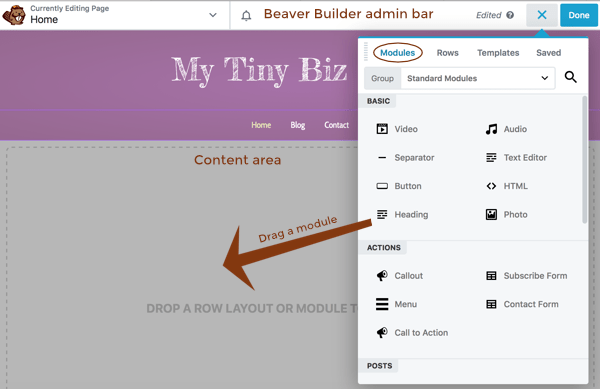
- Design your content from scratch by dragging individual modules into the content area. Click the Modules tab and drag a module into the layout.
After you or your clients open a page for editing, there's a great quick-start video that you can access by clicking the down arrow in the Beaver Builder admin bar and then in the Tools menu click Help.
The basics of content area layouts
When you drag content modules from the Content panel to the layout, the rows and columns are automatically created. As your layouts become more complex, with child columns, sometimes it's easier to drag in row layouts first, then drag content modules into them.
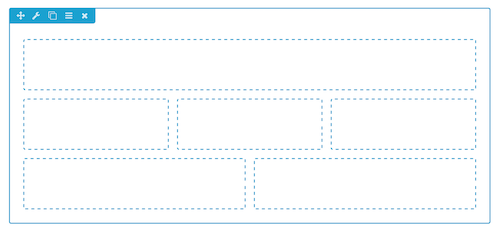
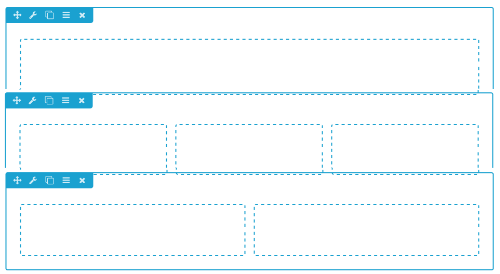
For example, here is a single row with three column groups, which can be thought of as rows within rows.
For more information about how columns work, see the column layouts overview.
In the screenshot above, all three column groups are inside a single row, but you could also put each column group into a different row, as shown in this screenshot:
What determines when you start a new row in your layout? See the article on working with rows for some considerations.
Think responsive
Beaver Builder makes layouts look good on medium devices (tablets) and small devices (mobile) with no extra effort on your part. You can check the layout and tweak settings at each device size by entering Responsive Editing Mode inside your layout.
For more information about responsive editing settings, start with this overview article on responsiveness.
Save Beaver Builder layouts for use elsewhere
You can save rows and modules globally, so that any change you make in one place is reflected everywhere, or you can save the rows and modules so you can reuse them but can modify them differently in each location. Or you can save the entire layout as a layout template, which you can use on any other page of your site or export for use on another site.
If you have the Unlimited license version of the Beaver Builder plugin, you can white-label the Beaver Builder UI. And with any edition of Beaver Builder, you can create custom editing environments for your clients by controlling which layout templates, rows, and modules are available to them.
Use Beaver Builder layouts for posts
By default, Beaver Builder is enabled only for WordPress pages, not for posts. When you enable posts or custom post types, you can use Beaver Builder to lay out the content area of single posts or custom post types. See the article on using Beaver Builder with Posts for more information.
Because WordPress index and archive pages are generated on the fly, you cannot use Beaver Builder to lay out those pages, though you can create Beaver Builder layouts that simulate the generated WordPress pages. For more information, see the article on generated WordPress archives vs. Beaver Builder layouts. Or, you can use the add-on Beaver Themer plugin to create custom WordPress index, archive, and search result layouts.
Beaver Builder Theme
WordPress requires use of a theme to control areas of the page like the header, footer, and sidebar areas. Themes allow you some degree of customization of appearance in these areas.
The Beaver Builder Theme has many layout and style options to control theme areas of the page, on both large screens and smaller devices. In addition, the Beaver Builder Theme is fully compatible with both the Beaver Builder and Beaver Themer plugins. All theme settings are made in the WordPress Customizer, which you can access from the Appearance menu in the WordPress admin panel. The Beaver Builder Theme has customizations for the following general categories:
- Presets, which apply built-in styling to the page if you don't want to customize all the theme settings yourself.
- Layout and styling of the header (top bar, header, nav bar), footer (widgets and footer bar), and sidebar.
- Layout and options for blog archives, single posts, and WooCommerce.
- Default style settings for Beaver Builder, such as accent color, heading and text fonts, and buttons.
- A section where you can add code to the head or body of your pages.
Header, footer, sidebar areas in the Beaver Builder Theme
The header contains two separate areas:
- The top bar, an optional strip above the header, which can contain one or two columns.
- The main header, which includes the logo and the nav area with a number of choices of layout. Some header choices allows separate styling of the nav area.
The footer also contains two separate areas, each optional:
- The main footer, similar to the top bar in allowing one or two columns.
- The footer widgets area, which appears above the footer.
Here's a diagram showing the header and footer subareas.
The sidebar is optional but if enabled, it will appear on every archive and post page, and also on any individual page when you set the WordPress template setting to display it.
Note that by default there is only one sidebar in Beaver Builder Theme, whose widget content will appear wherever you enable it (all Posts or individual Pages). You can't customize the sidebar widgets differently for individual posts and pages unless you use a third-party plugin or write code. Another way to customize the sidebar is to use the Beaver Builder plugin to create a Sidebar module in your content layout.
Beaver Builder Theme default settings for Beaver Builder
Beaver Builder Theme lets you set some of the defaults for Beaver Builder layouts. This saves time and makes it easy to get conformity in your page layouts site-wide unless you choose to override that behavior.
Here are some Beaver Builder Theme settings that apply to Beaver Builder layouts:
Accent color Sets the default color of both Theme and Beaver Builder links and buttons.
Headings Sets the default font family, size, and other font properties of headings in the content area.
Text Sets the default font family, size, and other font properties of non-heading text in the content area.
Background Sets a background color or image for the entire content area.
Lightbox Controls the default behavior or whether images open in a lightbox when clicked.
Current year shortcode The theme has a shortcode that automatically inserts the current year, both in theme areas of the page and in Beaver Builder and Beaver Themer layouts.